How to Register, Log In and Use Opofinance Broker



Imagine this: you're analyzing on TradingView's unmatched charts, you spot a position, and at that very moment, without having to open any intermediary platform, your trade opens with a single click! The reality of the forex market for us Iranians is this: no matter how precise your trading strategy is, if the broker you choose gives you trouble with deposits and withdrawals, has hidden spreads, or goes down at the peak of market volatility, you'll be the loser in this game.
OpoFinance broker (OpoFinance) - formerly also known as OpoForex - has become one of the top choices for smart traders by combining fast order execution infrastructure (STP/ECN) with modern trading tools. If you want to enter the financial markets without the risk of having your account blocked and with a fully transparent view, this expert step-by-step guide is written for you.
Opofinance Login: Accessing the Website and App with a Dedicated Server
Success in the financial markets depends on fractions of a second. Before joining Opofinance, understanding this broker's network infrastructure is essential to avoid slippage and order execution delays (Latency). For stable access, using virtual private servers (VPS) with a static IP is recommended.
Direct link to the Opofinance website and switching the language to Persian
To log in to your personal cabinet, it is best to always use this broker's official domain https://opo.finance so you can be sure your account and information are secure.
Because of technical issues on the Opofinance website, the Teagle team was unable to switch the site language to Persian using the language button in the top right corner. We suggest going directly to the Persian-translated site via the link https://opo.finance/fa . Having the user panel in Persian helps you better understand important concepts such as account terms of use, trading rules and market risk warnings, and become more familiar with the structure of Opofinance's services before you start trading.
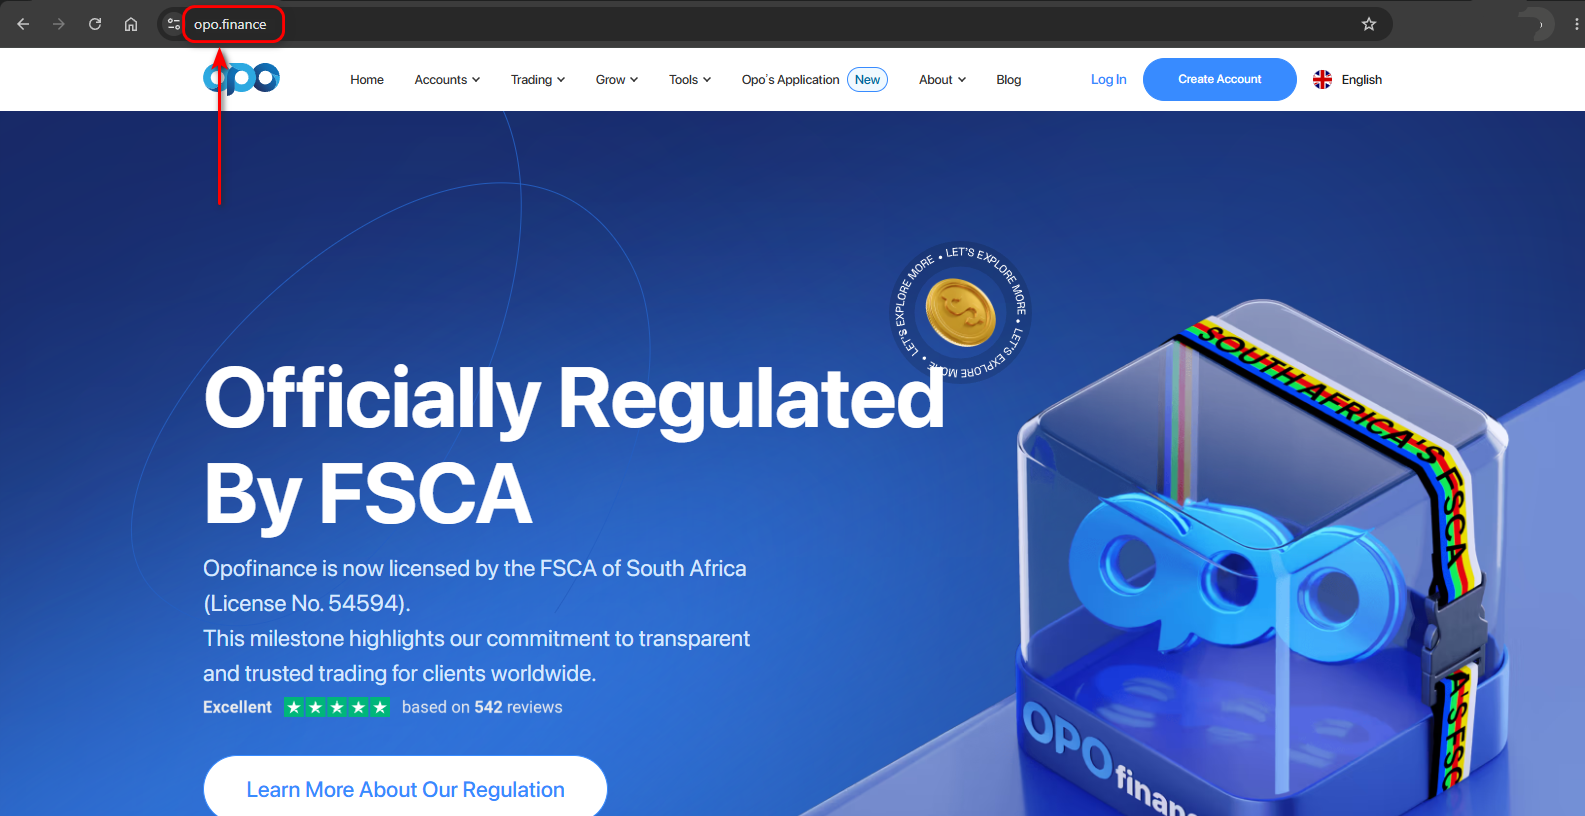

Download the Opofinance broker mobile app (Android/iOS)
For traders who monitor market positions on mobile platforms, we recommend using the dedicated Opofinance app. This app is not just a simple web view; it is a terminal connected to the broker's main API with very low latency. Also, thanks to the launch of the OpoTrade platform within the app, you no longer need to install MetaTrader 5 on your phone; you can open and close trades directly inside the Opofinance app on official TradingView charts.
Copy trading management (Social Trading): In recent updates, the social trading section has been fully integrated into the mobile app, so you can monitor and control your trading portfolio and the status of accounts linked to lead traders in real time.
Android version: The Opofinance app for Android can be downloaded directly from the official website or Google Play, and with support for biometric security features, it provides users with fast and secure login.
iOS version: The iOS version of the Opofinance app is designed with dedicated optimization for Apple's operating system and smooth chart rendering, and users can get it from the App Store and set it up in no time.
How to Register with Opofinance Broker
Signing up on the Opofinance website is not particularly complicated, and the steps are designed so that users can create their account in a short time. During this process, the user's identity information and documents are reviewed to keep the account secure and prevent possible problems in the future. This lets users start their trading activity with greater peace of mind.

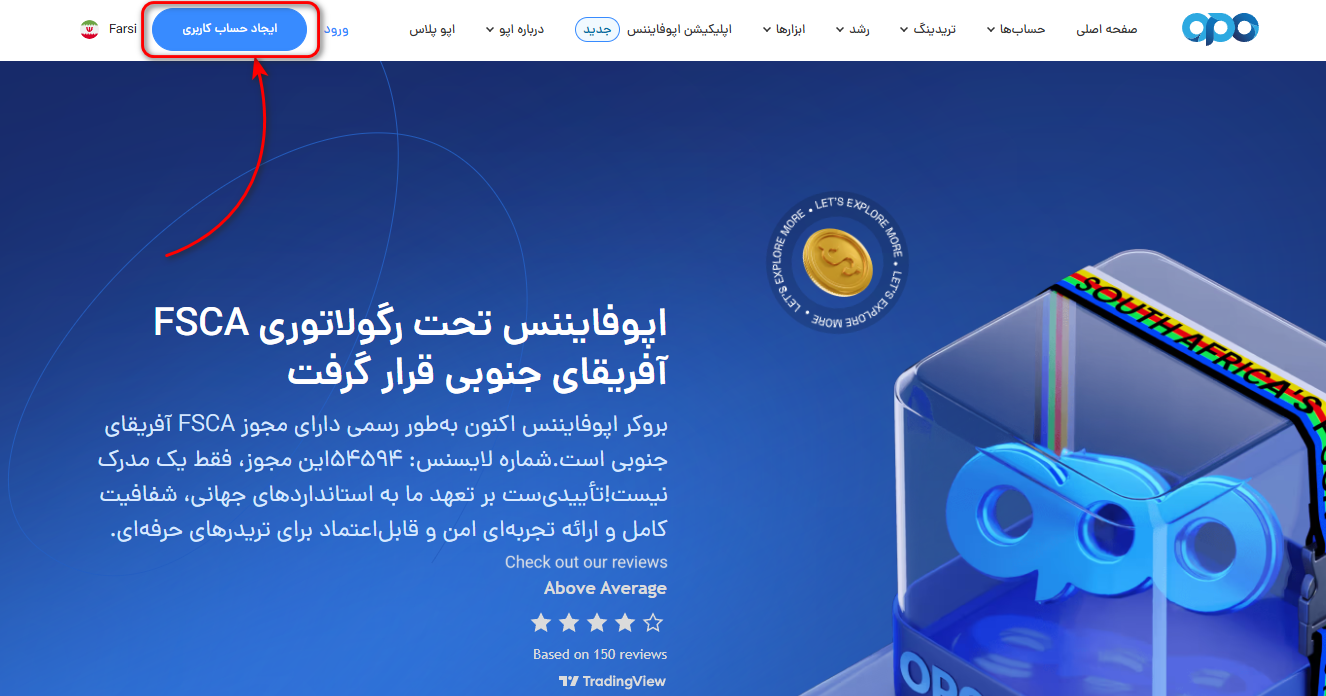
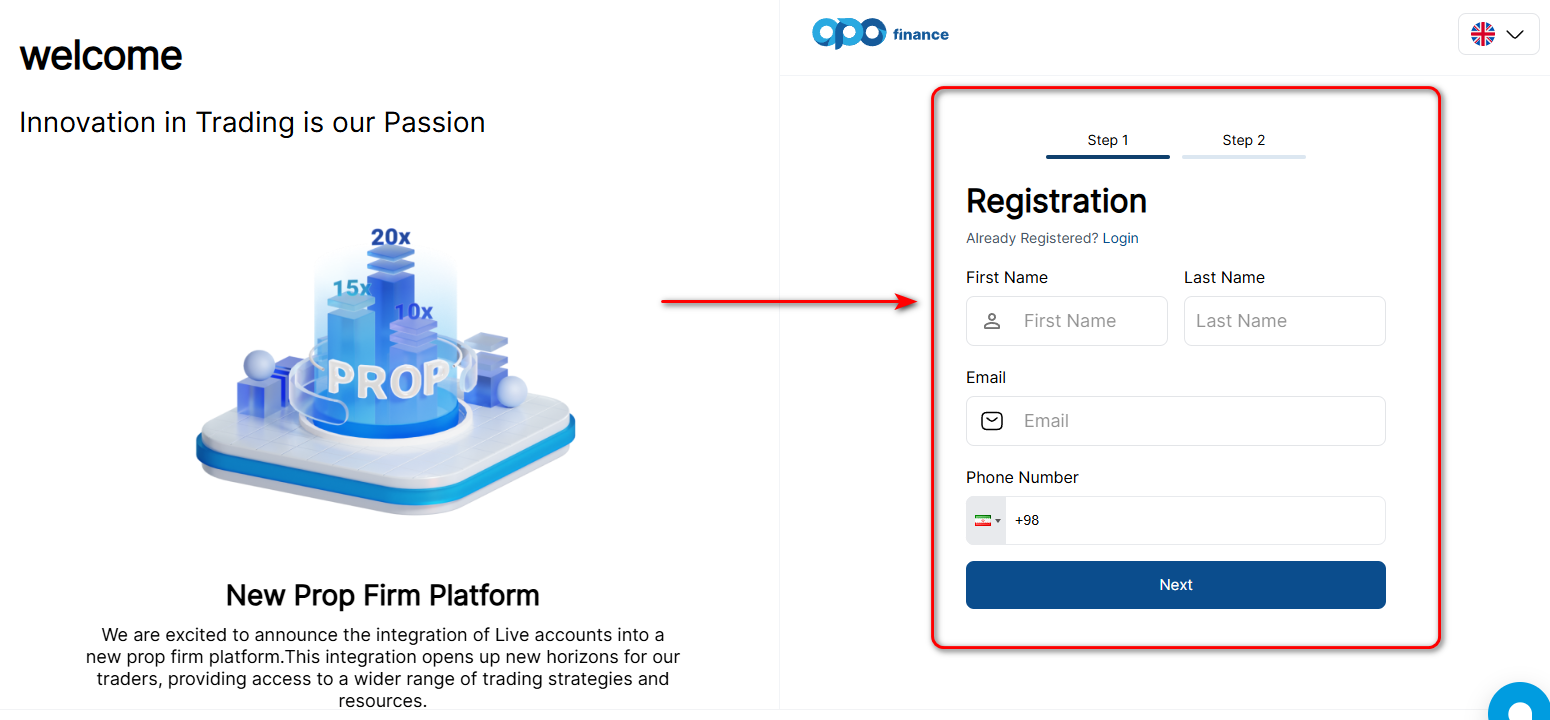
Step 1: Enter your name, email, phone number and date of birth (in Latin characters)
After clicking the open account option on Opofinance, you need to enter basic information such as your first name, last name, email, mobile number and date of birth. Note that all information must be written in English, and your first and last name must exactly match your identity documents, since they are checked in the later verification steps. Your date of birth must also be entered in the Gregorian calendar so that no problems arise during account approval. For the mobile number, simply enter the number without the leading zero, along with Iran's country code.
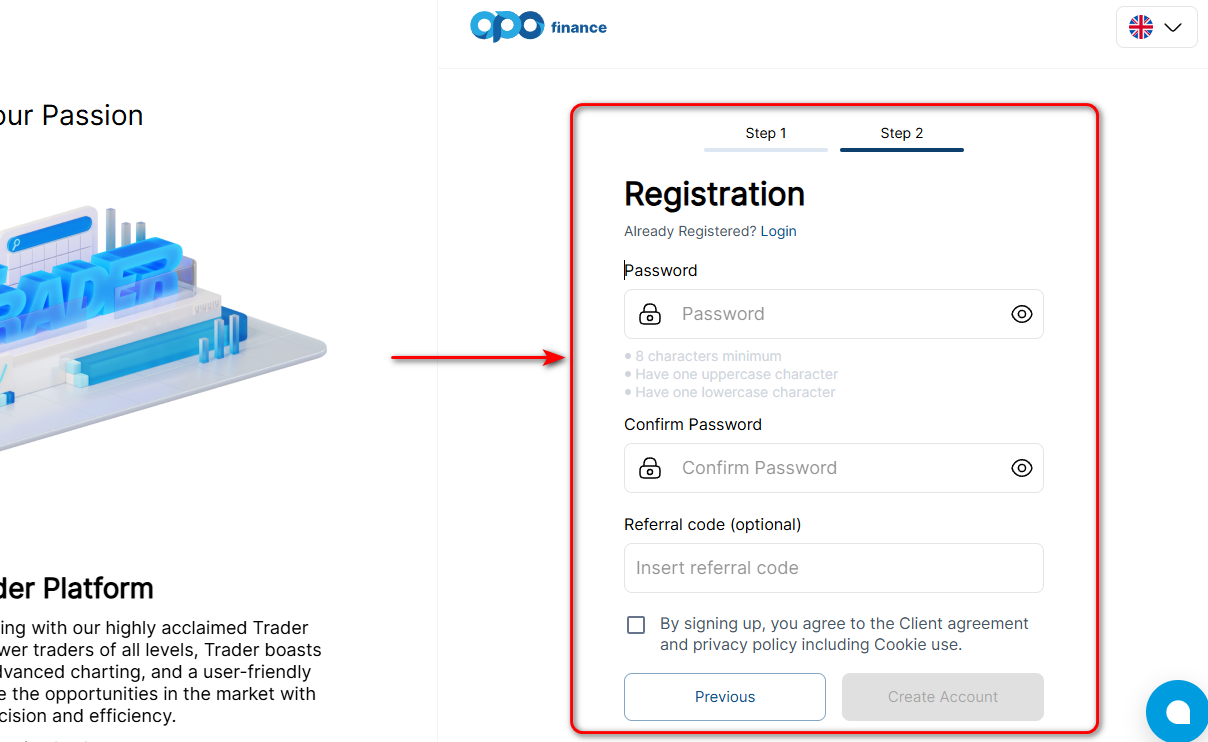
After entering your information, you move to the next step, where you need to set a password for your account. As with other platforms, password requirements at Opofinance broker include using numbers and uppercase and lowercase letters, with at least 8 characters. If you are signing up with a referral code, this is where you should enter it.

Step 2: Confirm your email and accept the broker's terms
After completing the registration form, a verification code is sent to your email. By entering this code, your account is activated and your secure connection with the broker is established. At this stage, you also need to accept Opofinance's terms and conditions of service. These terms cover important topics such as risk management, margin call and stop out, which you should have a general understanding of before you start trading.
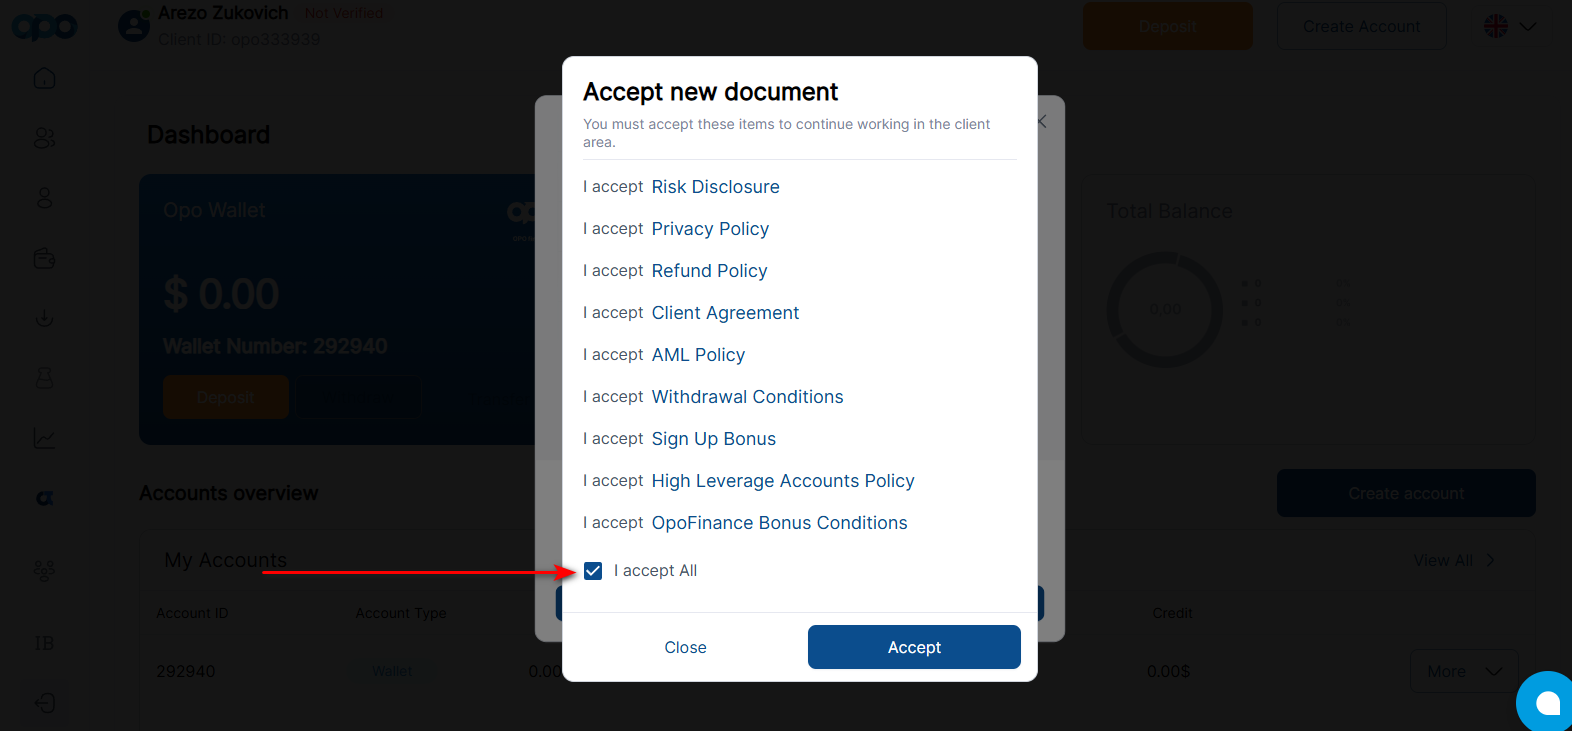
Step 3: Log in to the dashboard and choose a platform (MT4/MT5/cTrader)
After completing registration and logging in to Opofinance, you enter the user panel, i.e. the account management dashboard. In this section, you can create a demo or live trading account and choose your preferred platform. Opofinance offers users several popular, professional platforms, each with different features and trading environments.
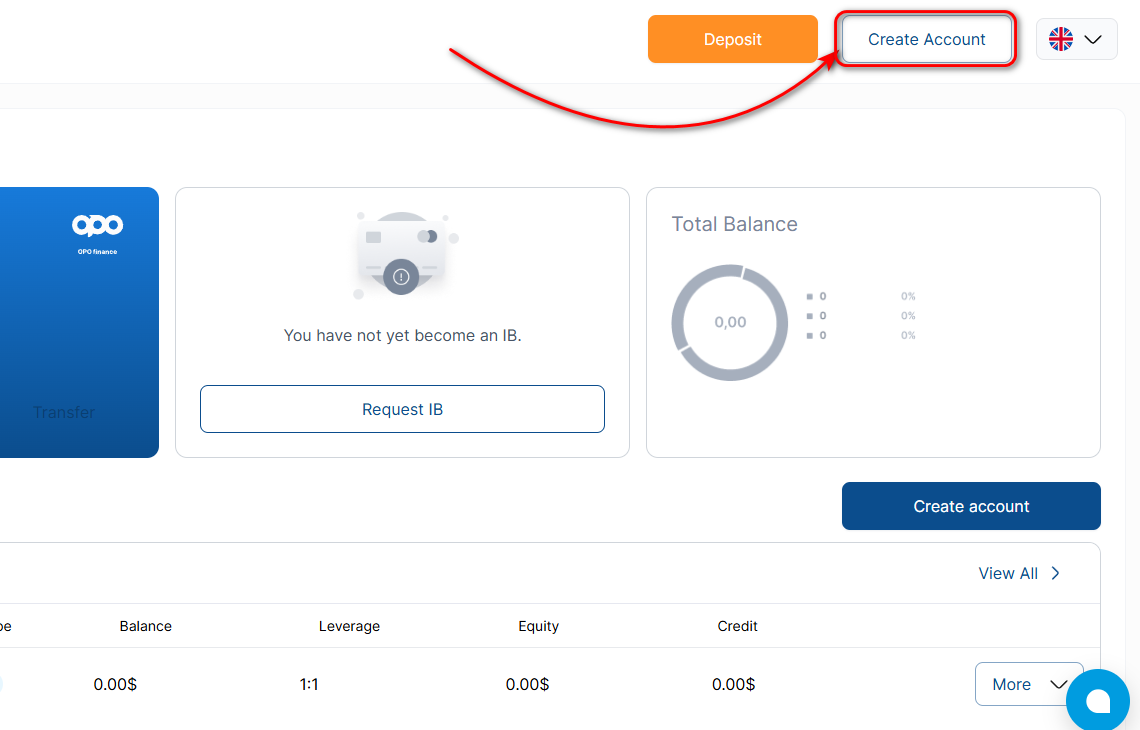
Users can usually choose between MetaTrader 4, MetaTrader 5, cTrader, TradingView and Opofinance's own proprietary platforms, so it is best to choose the right option based on your trading style and needs.
Opofinance Verification | Full KYC to Activate Your Account
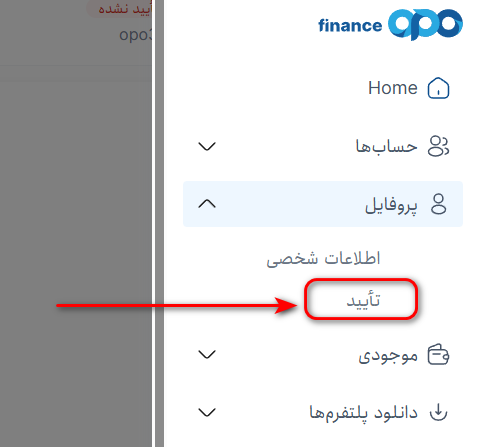
Identity verification, or KYC, is an essential step for full use of Opofinance's services. The process is carried out to improve account security, prevent financial abuse and comply with international anti-money laundering rules. Without completing verification, you won't be able to withdraw profits or fully access some account features. For these reasons, before you start trading you should go to your dashboard and profile settings and click the verify button.
Then specify your location to move on to the second verification step.
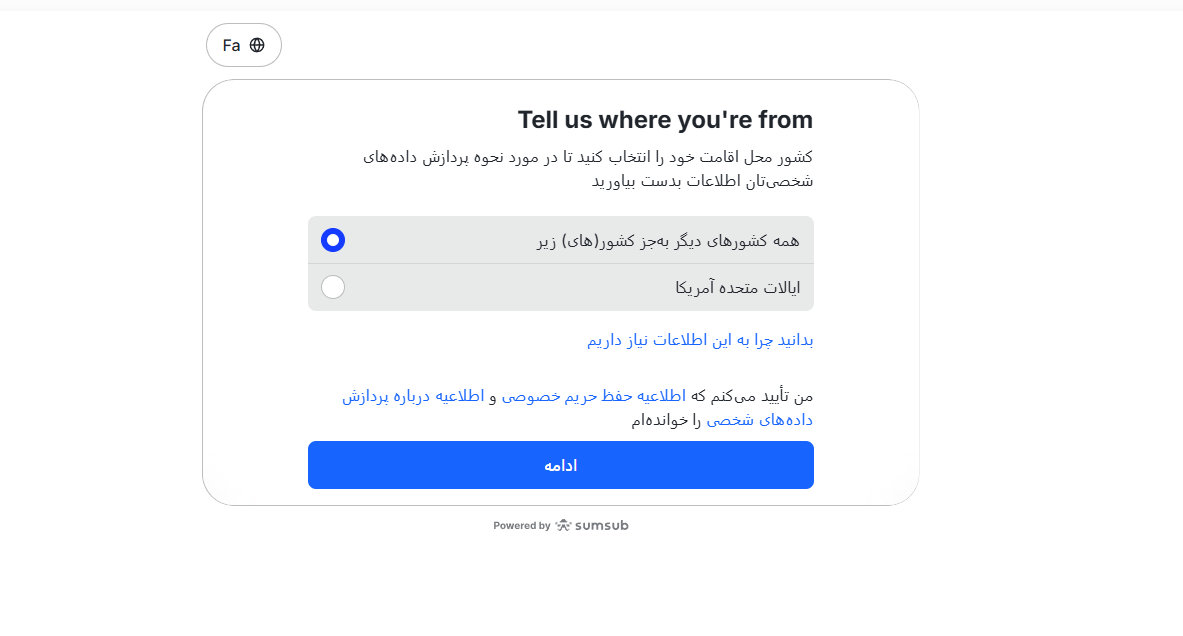 After setting your location, you move on to identity verification, or Proof of idrntity, where you need one of the following documents. It's best to upload these documents in good quality, with valid dates, in color and unedited so they get approved. The documents include:
- Driver's license
- National ID card
- Residence permit
- Passport
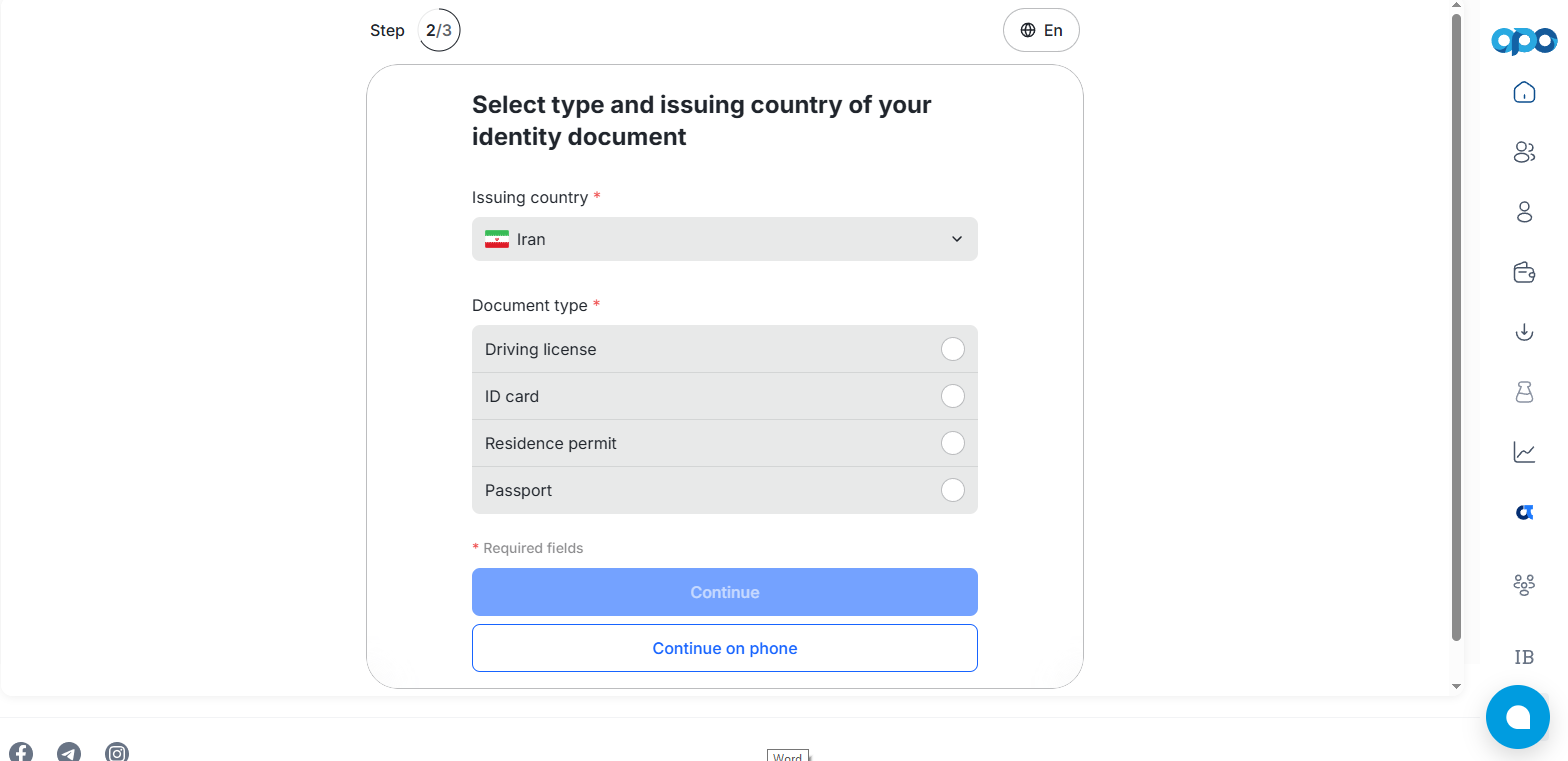
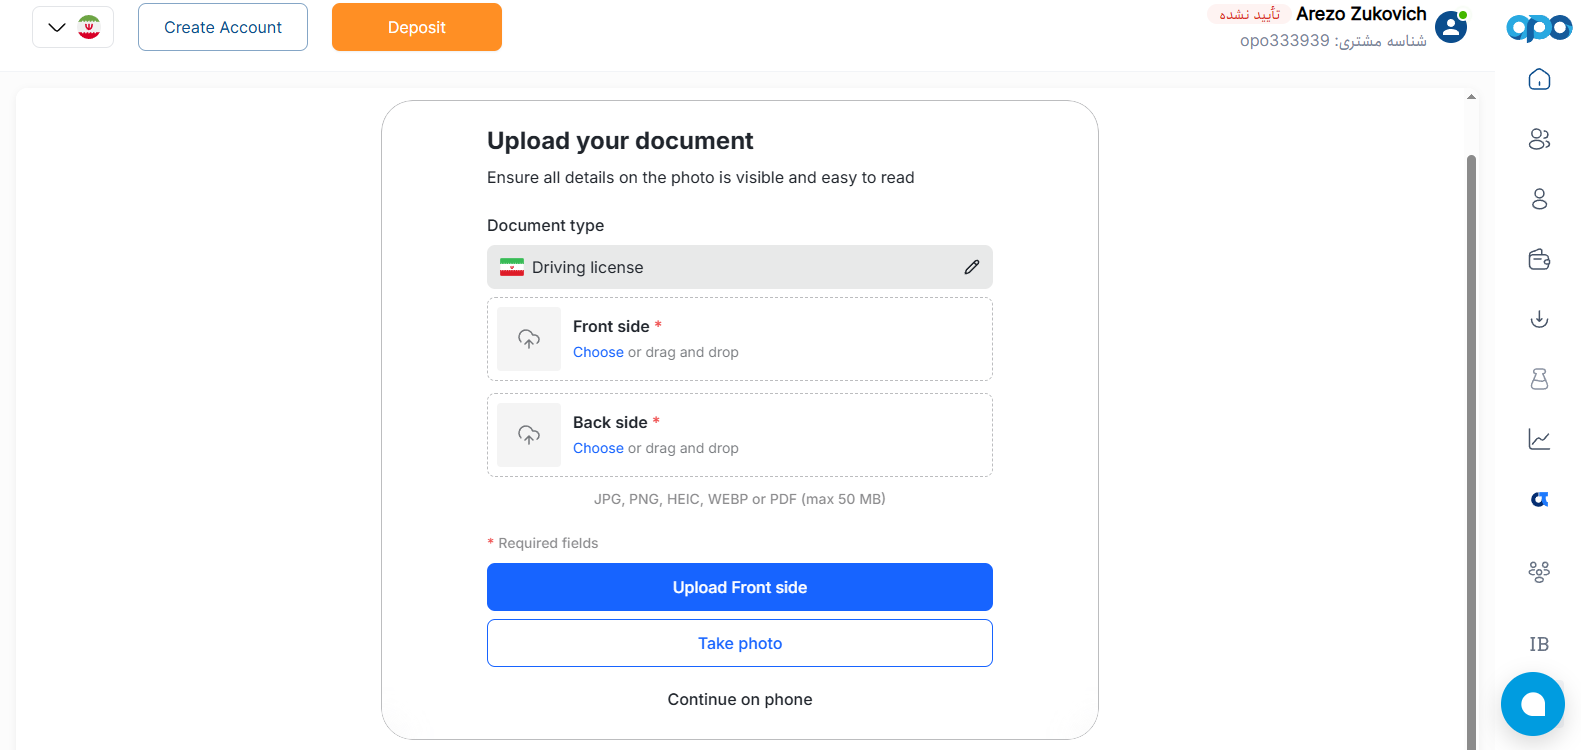
Whichever document you choose, you need to upload photos of both the front and back of it on the site, as shown in the image below.
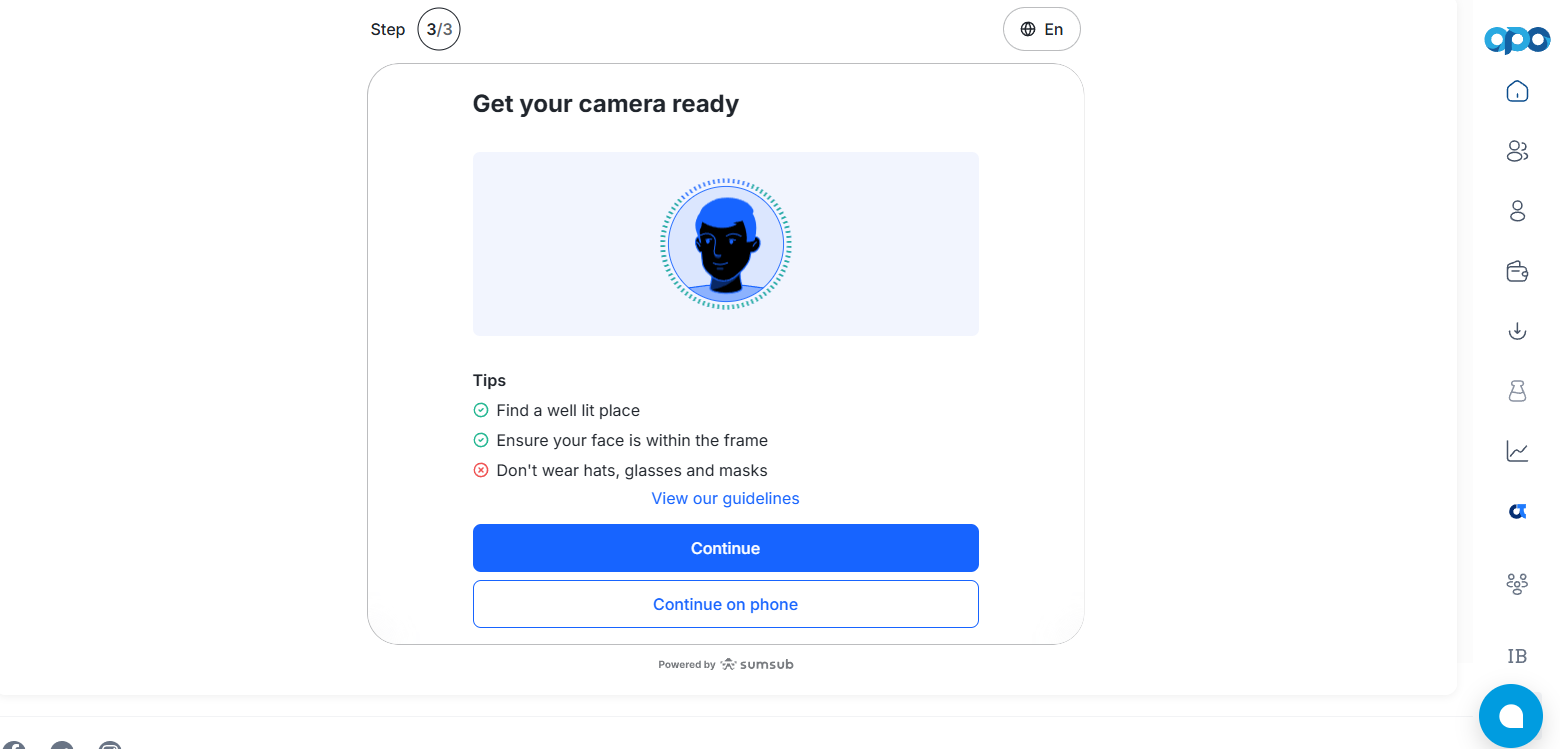
After uploading the document, the last step of identity verification is recording a video of yourself in line with Opofinance's rules. It's best to do this with a phone or webcam. The requirements are simple: your face just needs to be fully and clearly within the marked frame, without a hat, mask or sunglasses, and you move your head once.
Once your video is approved, you have passed the proof of identity step, and only the residency verification step, or proof of residency, remains.
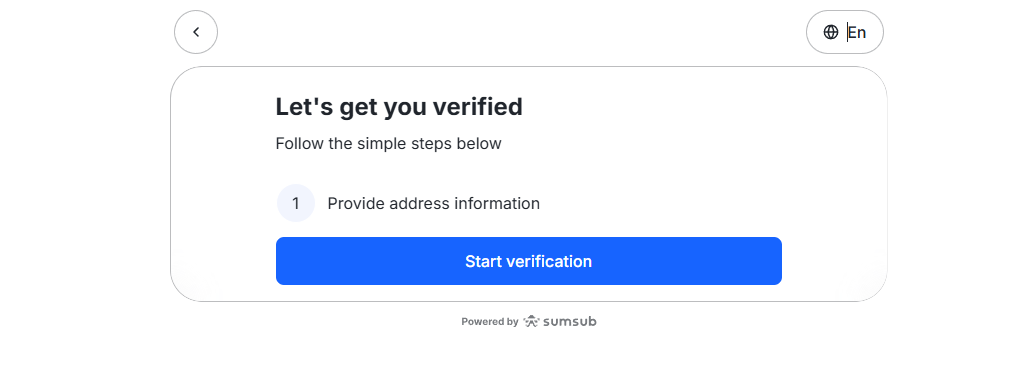
For this step you need one of the following documents:
- Valid ID document with address details (last 6 months)
- Utility bill (last 36 months)
- Government documents (last 36 months)
- Other (last 36 months)
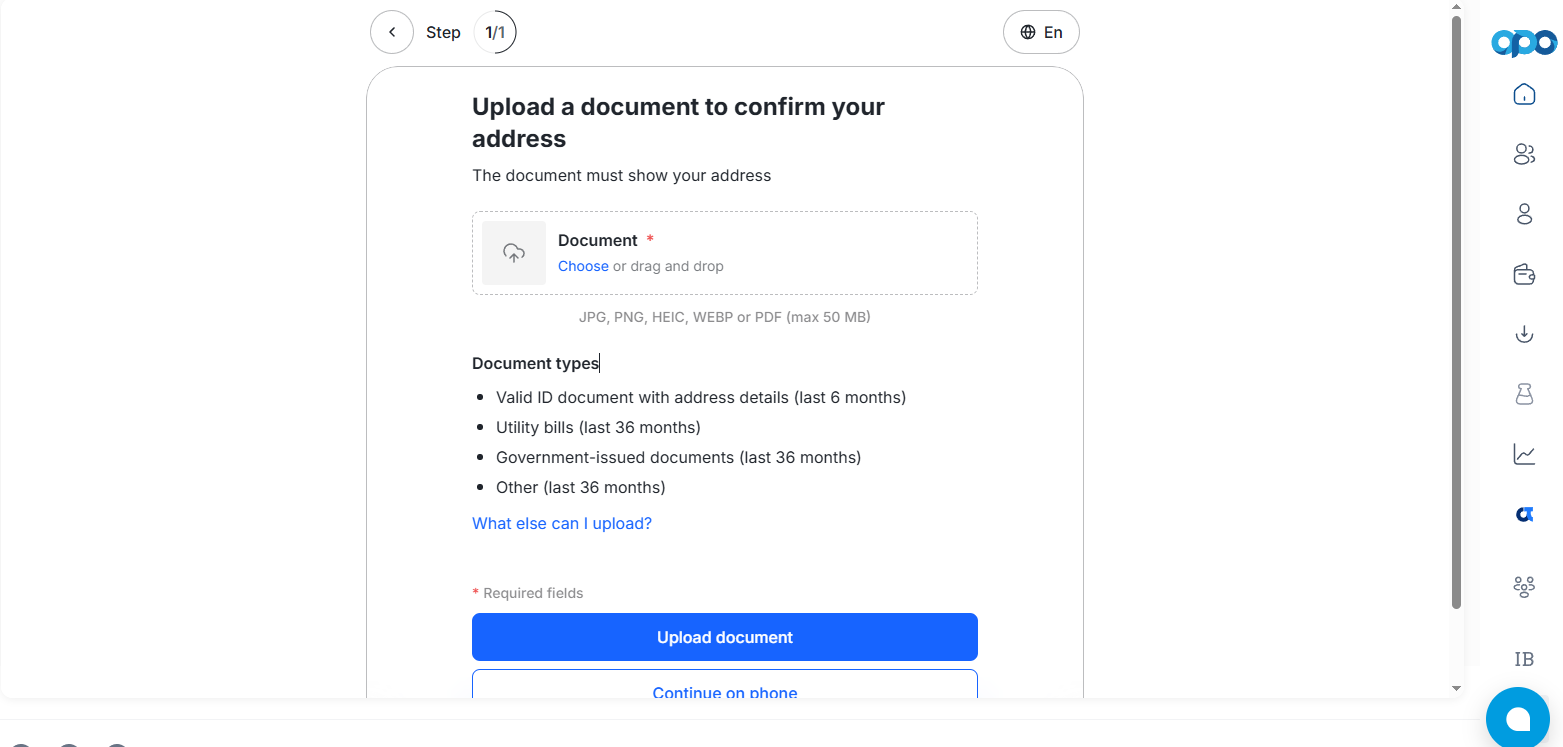
Once you upload your document and it is approved, your verification at Opofinance broker is approved and complete.
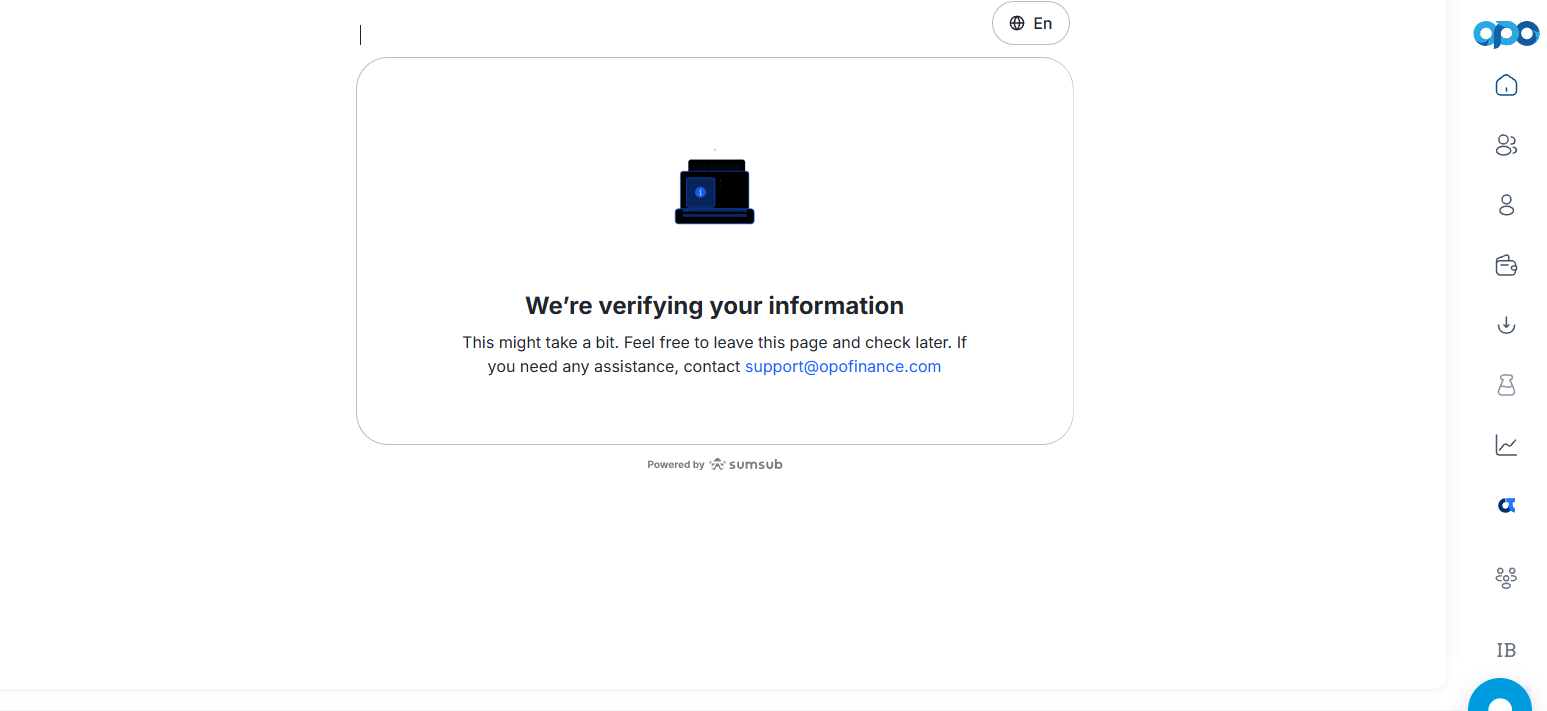
Approval time (usually 1-24 hours) and common issues
Document review at Opofinance usually doesn't take long and in most cases is done within 1 to 24 business hours. The process is handled systematically by the broker's document review team to make sure user information meets security standards.
However, some common mistakes can cause documents to be rejected or the account approval process to take longer. The most important ones are:
An expired passport, national ID card or residence documents; the address registered in your account differing from the address on the bill or statement; sending blurry, low-quality or cropped images; document details being unreadable due to poor lighting or low photo quality
To avoid these problems, it's best to send documents in high quality, in good lighting and without editing or cropping so that account approval goes faster.
Choosing and Opening a Trading Account at Opofinance
The variety of accounts at Opofinance lets traders choose the best option for their trading style and better manage trading costs such as spreads and commissions.
For example, the Standard account is mostly suited to people who prefer to trade without paying commission, although the spread on this account type is slightly higher. By contrast, the ECN account is designed for more professional traders and, with its very low spreads, is a good option for short-term trading and scalping; however, a separate commission is charged on this account.
Also, people who are not interested in trading directly or who want to use the strategies of professional traders can use the social trading and copy trading section within the broker's platform and automatically copy other traders' trades. Choosing an account type in the Opofinance personal dashboard is easy! Just select one of the Opofinance account types in the same section where you chose your trading platform on your dashboard's home page.
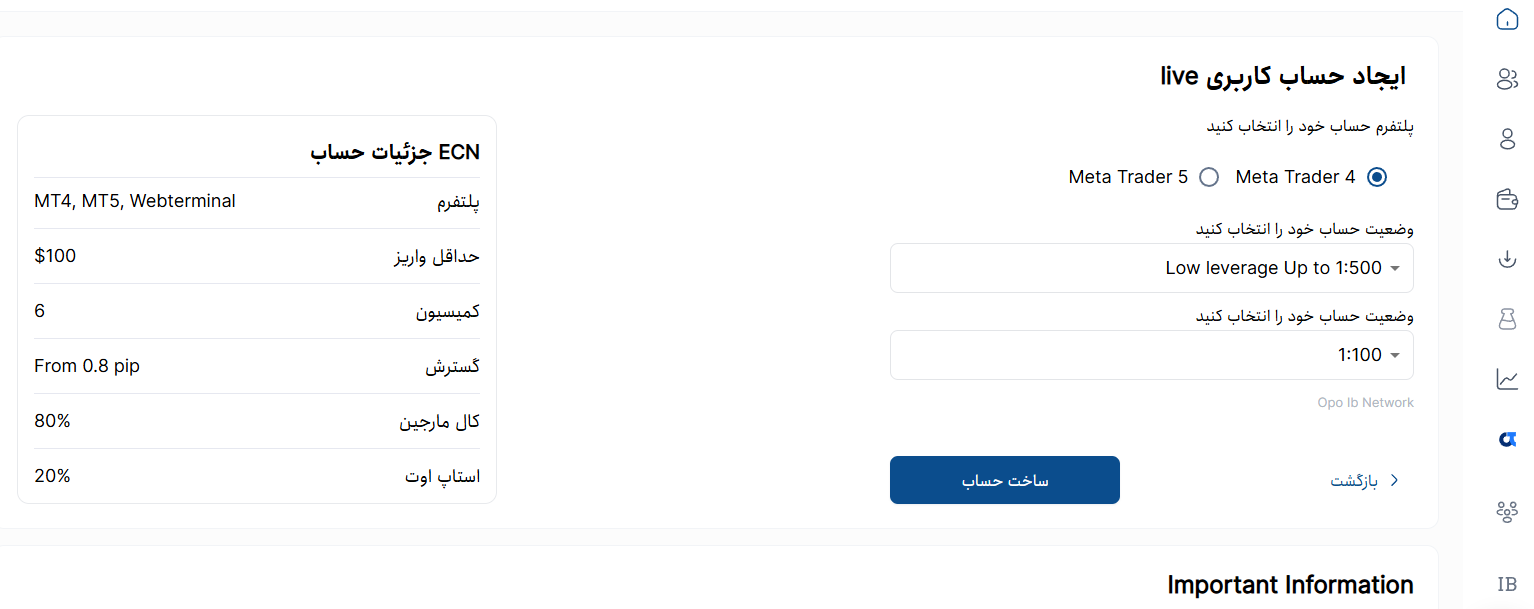
After choosing the account type, you need to specify the key settings for executing your trades, namely your desired leverage ratio and, if you have chosen the MetaTrader platform, the MetaTrader version.
Opofinance Islamic account: how to activate swap-free
To activate an Islamic account at Opofinance, simply log in to your dashboard and select the trading account you want from the Accounts section. Then, by going to the account settings, you can submit a request to enable or remove the Swap-Free feature. Requests are usually reviewed by the support team within 24 business hours.
However, before activating an Islamic account, it is best to keep a few important points in mind
The swap-free feature is only active for open trades for up to 14 days. If a trade stays open for more than 14 days, the swap fee will be charged for the entire two weeks of the trade.
The following Opofinance accounts are not eligible for the Islamic account:
- ECN Pro
- Social Trade Pro
- Prop
Depositing and Funding Your Account at Opofinance
Fast and secure deposits are one of the most important concerns for forex traders. Opofinance offers several different methods for funding an account, so everyone can choose the option that suits their situation.
Deposit with cryptocurrency (USDT)
Depositing Tether (USDT) is one of the most popular ways to fund an account at Opofinance. Users usually choose the TRC-20 and BEP-20 networks, because transfer fees on these networks are lower and transactions are usually completed quickly. This method is a good option for those who care about transfer speed and lower fees.
Funding your account with TopChange
For Iranian users, TopChange is one of the easiest ways to deposit to and withdraw from a trading account. Through this system, you can fund your account in Rials, and the currency conversion is done automatically. This is why many Iranian traders use this method.
Downloading and Installing Opofinance Broker's Trading Platforms
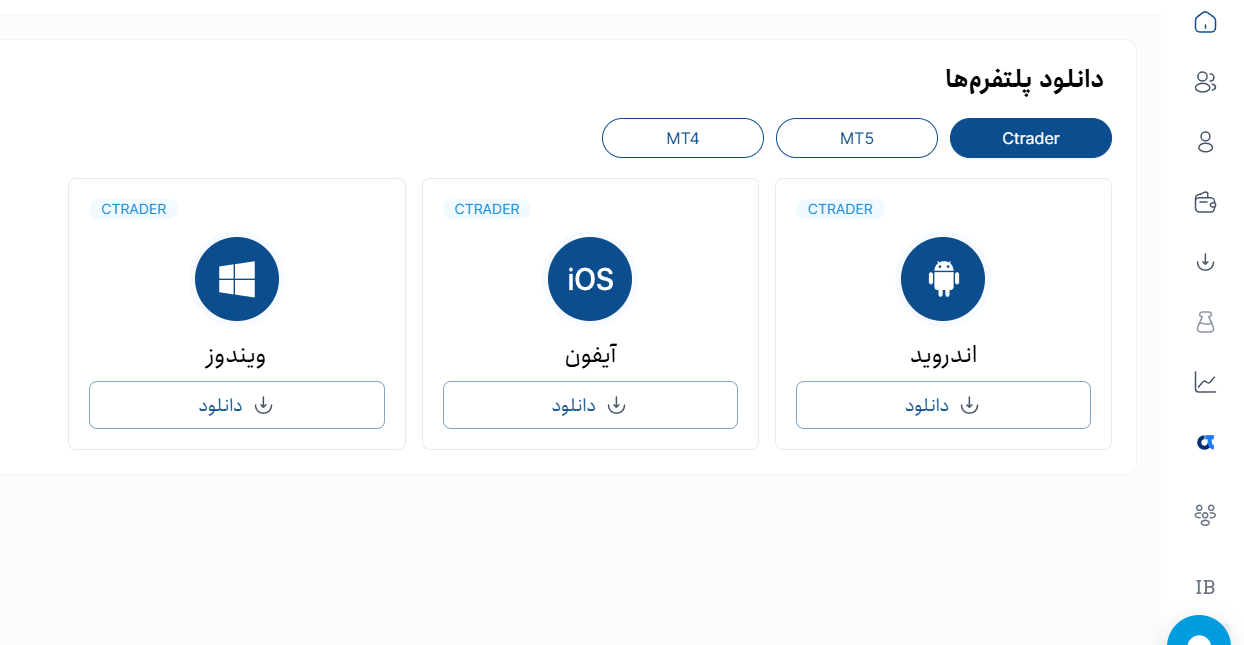
There is a simple, easy way to download the Opofinance broker's trading platforms: after signing up and accessing your account's personal dashboard, select the Platforms option in the dashboard menu. If you need the MetaTrader platforms, you can download any of them directly from the Platforms submenu.
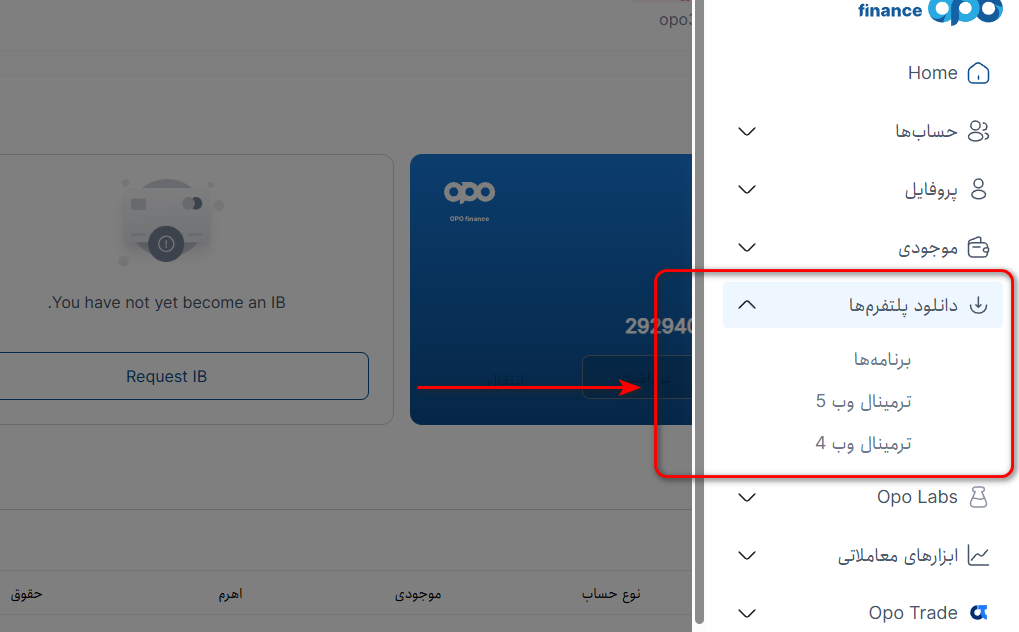
Or, if your chosen platform is cTrader or the Opofinance broker's own app, selecting the Apps option takes you to a page with separate download links.
Connecting Opofinance to TradingView
One of Opofinance's attractive features is the ability to connect your trading account to TradingView, a platform that many professional traders consider the best tool for chart analysis and market research.
With this connection, users can carry out technical analysis, review charts and even execute trades in a single environment. In fact, you no longer need to switch between your trading platform and your analysis tool, because you can manage your trades directly from within TradingView charts.
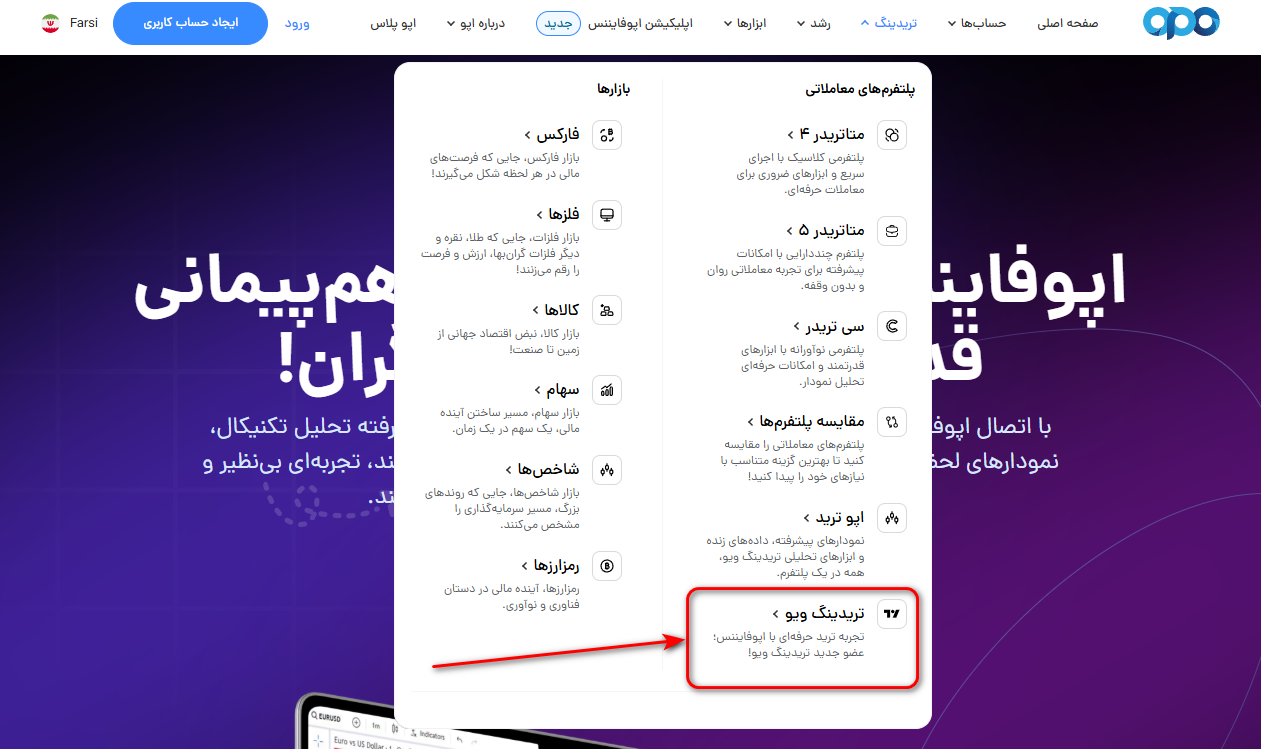
This feature is especially useful for traders who like Chart Trading, or trading directly from the chart, because it makes order execution, position management and market analysis simpler and more professional. You can go to the dedicated page for this service via the Trading menu on oppo.finance and the TradingView option, and after logging in, click the Log in to TradingView button.
Logging in to TradingView and connecting to Opofinance servers
After you click the Log in to TradingView button on the page for connecting TradingView to the Opofinance broker, if you have already registered with the broker, you only need to enter the email and password you signed up with.
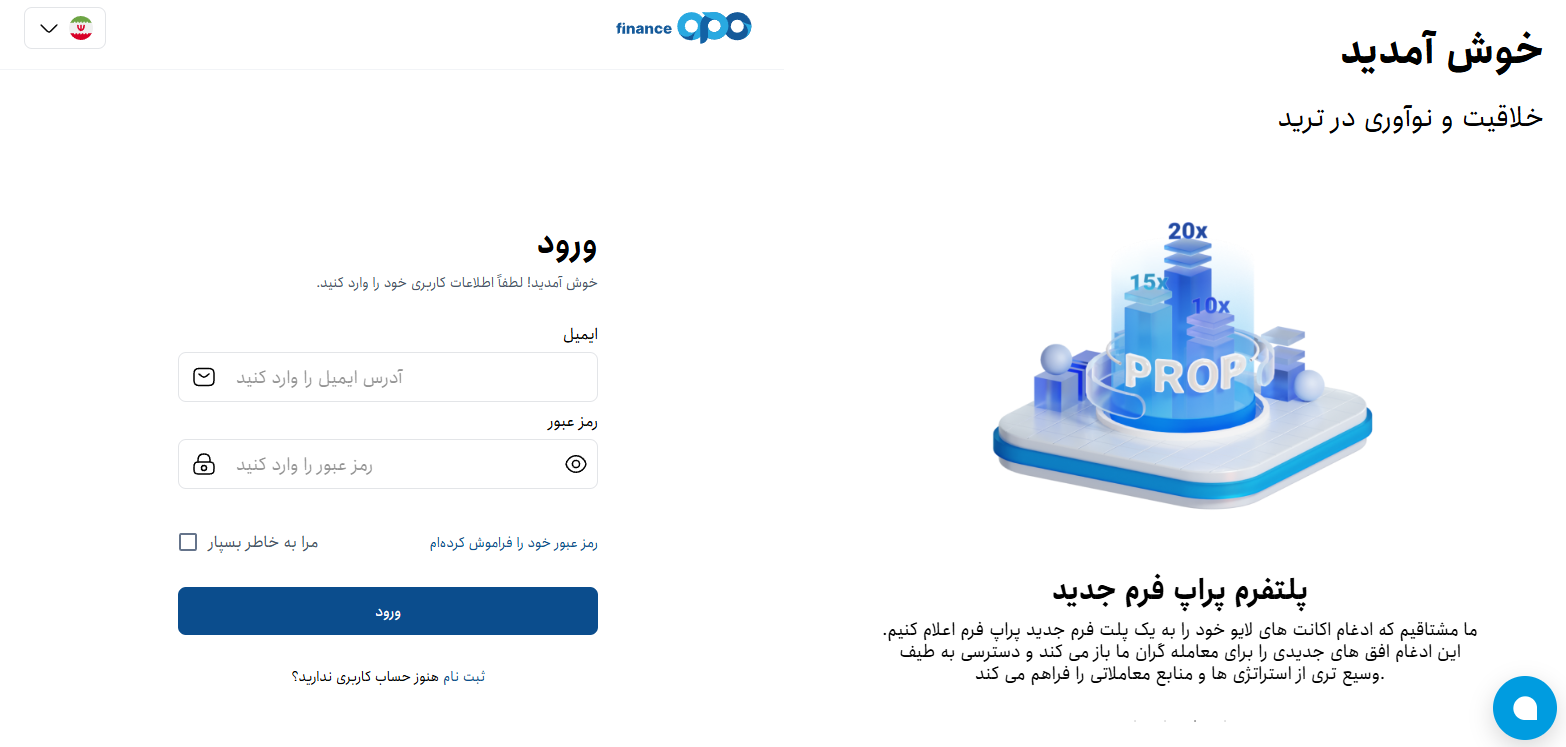
If you don't have an account with the Opofinance broker, instead of the login option you need to go through the sign-up path and complete the steps exactly as you would when registering with the Opofinance broker. After logging in, your account is connected and your trading data is transferred to the servers at high speed so you can experience Opofinance on TradingView live.
Withdrawing Profits from Opofinance Broker
To prevent financial abuse and comply with anti-money laundering rules, the broker's financial regulations are based on the principle of "matching deposit and withdrawal channels". If you funded your account with Tether, your withdrawal wallet address must also be of the same type (crypto). Once approved by the finance department, withdrawal transactions are processed as quickly as possible, depending on congestion on the blockchain network or the intermediary exchange.
Step 1: Log in to your personal cabinet and go to the transactions section
First, log in to your Opofinance account using your credentials (email and password). From the right-hand menu (the main menu on mobile), click "Finance" and then select the "Withdrawal" submenu.
Step 2: Transfer funds from your trading account to your internal wallet
To withdraw funds from Opofinance, you first need to transfer your balance or profit from your trading account to the main wallet in your user cabinet. This step is done before submitting a withdrawal request and essentially moves your balance from the trading platform to the finance section of your account.
In the Internal Transfer section, simply select your trading account, such as MetaTrader 5 or cTrader, as the source and set the Main Wallet as the destination.
Then enter the amount and confirm the transfer request. This process is usually instant and, in most cases, no fee is charged for it.
Step 3: Choose a withdrawal method
Next, Opofinance displays the various withdrawal methods. The key point is that you usually need to choose the same method you previously used to fund your account.
Withdrawal via Tether (USDT)
If you used cryptocurrency to deposit, you can also withdraw in Tether. In this section, you need to choose the transfer network. The TRC-20 and BEP-20 networks are usually the more popular choices among users due to their lower fees and faster transfers.
Then simply enter the destination wallet address; this can be your personal wallet or your account at a crypto exchange. To avoid errors, it is best to copy and paste the address directly rather than typing it manually.
Rial withdrawal via TopChange
Users of TopChange can transfer their withdrawal to their TopChange wallet. With this method, simply select the TopChange option and enter your wallet ID, or TC Wallet ID.
It is best for the TopChange account to be in your own name so the withdrawal goes through smoothly and faster.
Step 4: Enter the amount and confirm the security protocol (2FA)
At this stage, enter the amount you want to withdraw in dollars. Before final submission, Opofinance usually displays the full transaction details, including any applicable fee and the net amount you will receive.
After confirming the details and clicking the withdrawal button, a security step is triggered to protect your account. A one-time password (OTP) will be sent to your registered email or mobile number. Also, if you have enabled two-factor authentication, you need to enter the Google Authenticator code.
Once you enter the security code, your withdrawal request is finalized and sent for review.
Step 5: Check the transaction status in the history
After submitting a withdrawal request on Opofinance, you can track the status of your transaction in the Transaction History section of your user cabinet. Initially, the request is usually shown with the status «Under review» or Pending.
At this stage, the broker's finance team reviews your request to make sure the trading account meets the withdrawal requirements and that financial and security rules have been followed. For example, they check that open trades will not reduce the account's margin excessively and that there are no issues with verification or account details.
After final approval, the transaction status changes to «Completed» or Approved/Completed, and the withdrawn amount will be sent via your chosen method.
Articles related to the broker
User reviews

Newest
